
Showing posts with label cooking. Show all posts
Showing posts with label cooking. Show all posts
Friday, March 4, 2016
Monday, February 3, 2014
How I make yogurt in my dehydrator
I used to make yogurt like this because I didn't have a dehydrator, but then my whole world changed after my sweet husband found an Excalibur Dehydrator at a Goodwill for a shocking price.
Now I make yogurt in the dehydrator! I follow the instructions at Farm Bell Recipes.
I start with a gallon of milk and a big pot.

You also need some leftover yogurt (make sure it is the kind with active cultures) and 5 quart mason jars if you are using the whole gallon of milk.

I heat the milk on the stove to 180-185F... this takes 30 minutes or so on medium. Then remove it from the heat and let it cool to 110F, which takes FOREVER, but you don't want to chance killing your yogurt making buddies with too hot milk.
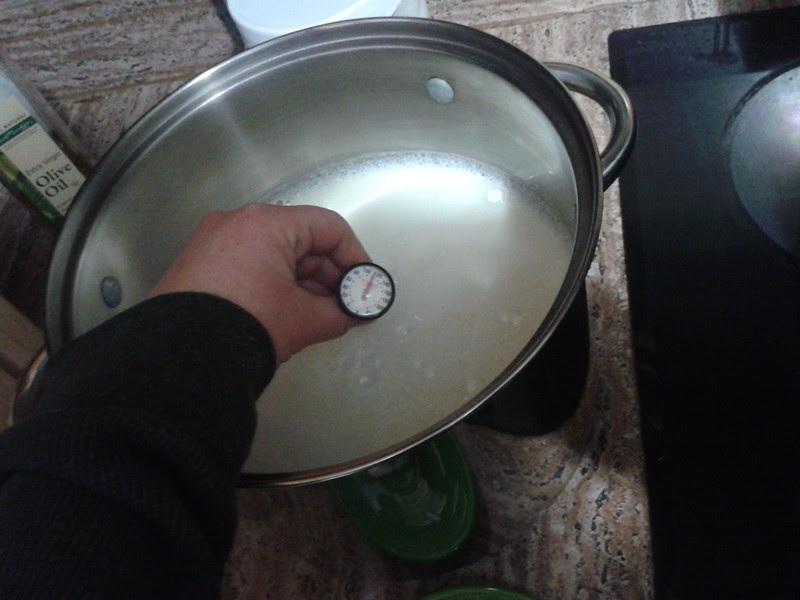
I preheat my dehydrator to about 110F, Farm Bell says 105F the dehydrator says 115F - I pick the middle for no reason... The white lids are from Wal-Mart, are BPA free, and only cost a couple dollars... totally worth it!

The yogurt goes in, and we wait 8 to 10 hours before moving it to the fridge to cool.

mmmm. smoothies. A gallon of organic whole milk yogurt for $5 or $6, and lasts at least a month or so in the fridge. A delicious budget friendly treat!
Now I make yogurt in the dehydrator! I follow the instructions at Farm Bell Recipes.
I start with a gallon of milk and a big pot.
You also need some leftover yogurt (make sure it is the kind with active cultures) and 5 quart mason jars if you are using the whole gallon of milk.
I heat the milk on the stove to 180-185F... this takes 30 minutes or so on medium. Then remove it from the heat and let it cool to 110F, which takes FOREVER, but you don't want to chance killing your yogurt making buddies with too hot milk.
I preheat my dehydrator to about 110F, Farm Bell says 105F the dehydrator says 115F - I pick the middle for no reason... The white lids are from Wal-Mart, are BPA free, and only cost a couple dollars... totally worth it!
The yogurt goes in, and we wait 8 to 10 hours before moving it to the fridge to cool.
mmmm. smoothies. A gallon of organic whole milk yogurt for $5 or $6, and lasts at least a month or so in the fridge. A delicious budget friendly treat!
Monday, August 26, 2013
Baking Day - Grainfree Style

Grain-Free Cheese Crackers?? Yes, Please!
I began this morning seeing what everyone was up to on Facebook, and one of my friends had shared a link to a recipe for grain-free cheese cracker dough... It is a paid PDF recipe, but I had never seen anything like it, and I had to have it! I am on the look out for easy grain-free foods to send in my preschooler's lunchbox and this looked perfect, and after trying it out, I definitely recommend this Primal Dough Recipe.

I tested the recipe today - with my new food scale from Wal-Mart (yep. I shop there). It was less than $20.00 and suits my needs.
I followed the directions for the "Primal Cheese Dough" which does contain dairy products, along with tapioca flour, and root vegetables. There is also a "Paleo" version provided with dairy substitutes. I have avoided Tapioca flour in the past, but decided that as a once in a while treat for lunches, car trips, etc I'm ok with it as an ingredient - and you use quite a bit of it for this recipe.

I rolled out and baked the crackers according to the instructions and they were moderately labor intensive, but not too difficult. It was fun to use my rolling pin again! (look - I baked a spaghetti squash too!) The baking takes longer than the recipe suggests as you have to break off the edge crackers and put the rest back in the oven repeatedly until they are all crisp. I found with my last batch that after I broke off the browned edge crackers, I turned off the oven and put the still slightly underdone center back in the warm oven to crisp up.

These turned out really delicious. It is difficult not to pop them in your mouth as you break them apart. Then the real test... would the picky 4 year old eat them? I gave her a small bowl to try... asked her what she thought and she said, "they're..... yummy!"
win! It's worth the $3.95: Here's where you get the recipe. :)

In other Paleo recipe testing, I made this Primal Fudge from Practical Paleo. I substituted peanut butter for the almond butter, and I swear... I just made a pile of Reece's Peanut Butter Cups!! They are SO GOOD.
Happy Baking!
Friday, August 16, 2013
Spicy Baked Sweet Potato Chips
Did you ever wonder how to make delicious sweet potato chips in your oven? Well wonder no more! It's easy, quick, and yum yum yummy.

Spicy Baked Sweet Potato Chips
Preheat Oven 450F
THINLY slice 2 long and narrow sweet potatoes (don't get the big fat potatoes and expect similar results). In a large bowl stir the slices with 1/4th cup melted coconut oil.
Sprinkle with the spices of your choice and mix well. I used approximately:
1 tsp salt
1/2 tsp cumin
1/2 tsp garlic powder
1/4 tsp red cayenne pepper
Lay potatoes in a single layer on cookie sheets and bake at 450F for 10 minutes. Flip the the slices, rotate the pans in the oven, and bake for another 10 minutes. Watch carefully and remove pans early if they are starting to darken. The thinner the slices the faster they will cook. Let slices cool on pans, gently remove, and enjoy! About 4 servings.
Thursday, September 20, 2012
Planning Meals with Leftovers in Mind
I enjoy meal planning. I like to have a plan for grocery shopping and an idea of what I am going to make during the week.
I have found meal planning as a stay at home (most of the time) mom much different then meal planning for when I was working. When I was working full time, I would plan a meal for each night. I wasn't a big fan of taking leftovers for lunch unless it was a meal I really loved, so I would pretty much just make what we needed for that one dinner. I also didn't have children running around like wild banshees in the kitchen when I was working.... that definitely makes cooking dinner a new and exciting experience!
Now that I am home, I find that the time I have for cooking is difficult to plan. I can not plan ahead for temper tantrums, fussy babies, and general mommy grumpiness. Grumpiness happens. Some nights I have more time to cook than others. Also, since we are home I find myself wanting leftovers for lunch. It is so simple to reheat leftovers and feel like you have had a satisfying mid-day meal... versus trying to create a meal or just snacking. So my new tactic for meal planning is.....
Plan for 2 LARGE meals a week and 3 regular dinners.
For example:
Sunday I made one of our favorites, spaghetti squash with meat sauce. I made a lot. I cooked 2 large squashes and 2 lbs of beef in the sauce. There was room in the oven, so I also quartered new potatoes and roasted a tray of them along with the squash.
Monday I made Beef and Mushroom stew in the Crockpot and served it over the new potatoes cooked the day before. I doubled my recipe: 3 lbs of beef and 2 lbs of mushrooms.
Tuesday - Leftovers
Wednesday - Real meal!
Thursday - Real meal!
Friday - Leftovers or Costco food :)
Saturday - Real meal!
With all this delicious food cooked early in the week, we have plenty for lunches - for both the girls and I and for David to take to work.
Here is how I keep leftovers fresh and inviting:
Pack leftovers in separate containers - no mixing!
- Spaghetti Squash in one container, meat sauce in another. That way if you want to serve the kids up some plain buttered squash, you can! You can also easily used leftover roasted potatoes as a side dish with another meal. Just because they are leftovers doesn't mean you have to keep eating the same meal over and over.
Don't be afraid of the buffet style dinner.
- I am not a big fan of everyone eating something different for dinner, but there is nothing wrong with a good ol' fashioned leftover night. Serving up a variety of leftovers for dinner on a night that you don't have time to cook is much healthier than ordering pizza.
Know what you like to eat as leftovers.
- I do not like to eat leftover chicken. I just don't. So, when we have chicken for dinner, I make enough for just that meal and maybe for David's lunch so that I don't have to feel guilty about not eating leftover chicken. However, I love leftover chili... every time I make chili, I make lots. Know what you like, and make that!
Tried and True Recipes are best.
- Don't big-batch a brand new recipe...Just don't do it. If you are trying out a new recipe, great! But, don't spend extra money doubling it if you are not sure it is going to go well and everyone is going to like it.
Change up the Menu.
- I try to do different BIG meals every other week so that we don't feel that we are ALWAYS eating the same foods. I also try to see what is in season and on sale when planning so that I can get the most for my money.

This is working well for us, and I am really enjoying the versatility of my leftovers. I also like having lots of easy options for my kids' lunches.
How has your meal planning evolved over the years?
I have found meal planning as a stay at home (most of the time) mom much different then meal planning for when I was working. When I was working full time, I would plan a meal for each night. I wasn't a big fan of taking leftovers for lunch unless it was a meal I really loved, so I would pretty much just make what we needed for that one dinner. I also didn't have children running around like wild banshees in the kitchen when I was working.... that definitely makes cooking dinner a new and exciting experience!
Now that I am home, I find that the time I have for cooking is difficult to plan. I can not plan ahead for temper tantrums, fussy babies, and general mommy grumpiness. Grumpiness happens. Some nights I have more time to cook than others. Also, since we are home I find myself wanting leftovers for lunch. It is so simple to reheat leftovers and feel like you have had a satisfying mid-day meal... versus trying to create a meal or just snacking. So my new tactic for meal planning is.....
 |
| mmmm leftovers.... |
Plan for 2 LARGE meals a week and 3 regular dinners.
For example:
Sunday I made one of our favorites, spaghetti squash with meat sauce. I made a lot. I cooked 2 large squashes and 2 lbs of beef in the sauce. There was room in the oven, so I also quartered new potatoes and roasted a tray of them along with the squash.
Monday I made Beef and Mushroom stew in the Crockpot and served it over the new potatoes cooked the day before. I doubled my recipe: 3 lbs of beef and 2 lbs of mushrooms.
Tuesday - Leftovers
Wednesday - Real meal!
Thursday - Real meal!
Friday - Leftovers or Costco food :)
Saturday - Real meal!
With all this delicious food cooked early in the week, we have plenty for lunches - for both the girls and I and for David to take to work.
 |
| Did you know that having a well stocked freezer will help you cook delicious meals with less effort?? |
Here is how I keep leftovers fresh and inviting:
Pack leftovers in separate containers - no mixing!
- Spaghetti Squash in one container, meat sauce in another. That way if you want to serve the kids up some plain buttered squash, you can! You can also easily used leftover roasted potatoes as a side dish with another meal. Just because they are leftovers doesn't mean you have to keep eating the same meal over and over.
Don't be afraid of the buffet style dinner.
- I am not a big fan of everyone eating something different for dinner, but there is nothing wrong with a good ol' fashioned leftover night. Serving up a variety of leftovers for dinner on a night that you don't have time to cook is much healthier than ordering pizza.
Know what you like to eat as leftovers.
- I do not like to eat leftover chicken. I just don't. So, when we have chicken for dinner, I make enough for just that meal and maybe for David's lunch so that I don't have to feel guilty about not eating leftover chicken. However, I love leftover chili... every time I make chili, I make lots. Know what you like, and make that!
Tried and True Recipes are best.
- Don't big-batch a brand new recipe...Just don't do it. If you are trying out a new recipe, great! But, don't spend extra money doubling it if you are not sure it is going to go well and everyone is going to like it.
Change up the Menu.
- I try to do different BIG meals every other week so that we don't feel that we are ALWAYS eating the same foods. I also try to see what is in season and on sale when planning so that I can get the most for my money.
This is working well for us, and I am really enjoying the versatility of my leftovers. I also like having lots of easy options for my kids' lunches.
How has your meal planning evolved over the years?
Thursday, June 7, 2012
Grain-Free Turkey Meatballs, 2 Ways (and a soup!)
We are crazy about meatballs. They make a super-easy lunch for young children and are very versatile additions to the weekly dinner menu. This week I decided to shake things up a bit and make two huge batches of Turkey and Turkey & Sausage Meatballs - over 100 meatballs in total.
Meatballs are a very simple recipe, that you can easily change up to suit your taste. Here is how I make them:
Grain-Free Turkey Meatballs (or Turkey & Sausage Meatballs)
4 lbs of ground turkey (or 2 lbs each ground turkey and ground Italian pork sausage)
- The plain turkey version is much milder and quite lean, they are best eaten in a thick sauce or in a soup as I will describe below.
1 medium yellow onion, finely diced
2 Tbsp olive oil
2+ cloves garlic, minced
2 eggs, beaten
1/4 - 1/2 cup dried parsley
1/8 - 1/4 cup dried basil (I like a more parsley, less basil seasoning)
Salt and Pepper, generous
Preheat oven to 375F. Saute the onion and garlic in the oil until nice and soft. In a large bowl, combine the ground meat, onion mixture, eggs, and seasonings. Mix very well (using your hands - clean! - is the easiest method). Form 1 to 1 1/2 inch balls and place them on ungreased, rimmed cookie sheets. These can be placed quite close together as they will shrink while cooking.
Place sheets in preheated oven and bake for 20 minutes, rotate trays and flip meatballs over, continue baking for 15 - 20 minutes or until meatballs are cooked through.
Serve alone, with your favorite sauce, or as a part of the soup below. If freezing, cool completely, place in freezer bags and lay flat to freeze.
Summer Vegetable and Turkey Meatball Soup
Serves 4
12 meatballs, reheated if frozen.
2 strips thick bacon, cut into chunks
1 medium onion, sliced thin
1 medium zucchini, quartered and chopped
8 cremini mushrooms, quartered
1 tsp each, dried rosemary, thyme, and oregano
3 cups chicken broth
1 14oz can diced tomatoes
salt and pepper, to taste
Roasted potatoes & Parmesan (optional for serving)
In large sauce pan, cook bacon over medium-high heat. When bacon begins to get fatty and starts to shrink add onion, and cook until soft. Add vegetables, cooking until they are starting to brown. Mix in herbs, broth, tomatoes and meatballs. Bring to a boil, reduce heat and simmer until warmed through. Salt and pepper to taste. Serve alone or over oven-roasted red potatoes, and sprinkle with shredded Parmesan.
Enjoy!
`
I wish I had a picture to show you, but right now all I've got is an empty plate, a full belly, and dozens of delicious meatballs in the freezer.
Meatballs are a very simple recipe, that you can easily change up to suit your taste. Here is how I make them:
Grain-Free Turkey Meatballs (or Turkey & Sausage Meatballs)
4 lbs of ground turkey (or 2 lbs each ground turkey and ground Italian pork sausage)
- The plain turkey version is much milder and quite lean, they are best eaten in a thick sauce or in a soup as I will describe below.
1 medium yellow onion, finely diced
2 Tbsp olive oil
2+ cloves garlic, minced
2 eggs, beaten
1/4 - 1/2 cup dried parsley
1/8 - 1/4 cup dried basil (I like a more parsley, less basil seasoning)
Salt and Pepper, generous
Preheat oven to 375F. Saute the onion and garlic in the oil until nice and soft. In a large bowl, combine the ground meat, onion mixture, eggs, and seasonings. Mix very well (using your hands - clean! - is the easiest method). Form 1 to 1 1/2 inch balls and place them on ungreased, rimmed cookie sheets. These can be placed quite close together as they will shrink while cooking.
Place sheets in preheated oven and bake for 20 minutes, rotate trays and flip meatballs over, continue baking for 15 - 20 minutes or until meatballs are cooked through.
Serve alone, with your favorite sauce, or as a part of the soup below. If freezing, cool completely, place in freezer bags and lay flat to freeze.
Summer Vegetable and Turkey Meatball Soup
Serves 4
12 meatballs, reheated if frozen.
2 strips thick bacon, cut into chunks
1 medium onion, sliced thin
1 medium zucchini, quartered and chopped
8 cremini mushrooms, quartered
1 tsp each, dried rosemary, thyme, and oregano
3 cups chicken broth
1 14oz can diced tomatoes
salt and pepper, to taste
Roasted potatoes & Parmesan (optional for serving)
In large sauce pan, cook bacon over medium-high heat. When bacon begins to get fatty and starts to shrink add onion, and cook until soft. Add vegetables, cooking until they are starting to brown. Mix in herbs, broth, tomatoes and meatballs. Bring to a boil, reduce heat and simmer until warmed through. Salt and pepper to taste. Serve alone or over oven-roasted red potatoes, and sprinkle with shredded Parmesan.
Enjoy!
`
Monday, April 2, 2012
Cooking for Baby: Pureed Pears
Baby Clare is now 7 1/2 months old. I have been very slowly introducing a few solid foods into her diet as she shows a lot of interest in dinnertime activities. She has now had occasional little tastes of brown rice cereal, oatmeal, banana, avocado, butternut squash, mashed potatoes, and ice cream (oops.).
Today I pulled out my absolute favorite baby food cook book: Cooking for Baby by Lisa Barnes. You will find the newer addition of the book here: Cooking for Baby: Wholesome, Homemade, Delicious Foods for 6 to 18 Months
 .
.


I always recommend this book to new moms who are interested in preparing homemade foods for their babies because the recipes are simple, the information is solid, and the pictures are beautiful.
Pureed Pears were on the menu today since we have some absolutely lovely and sweet pears right now. I quartered and cored two pears (keeping the skins on). Steamed them for about 5 minutes. Let them cool and used a spoon to remove the skins. Then it was into the food processor with them and in moments we had Pear Puree!
2 pureed pears filled 1 1/2 ice trays leaving just enough for Clare to lick the bowl clean :) I use these special "Baby" ice trays: Fresh Baby Trays . I like the ice-cube size because it is easy to customize... one cube of pear mixed with one cube of green beans or some other puree. After they are completely frozen I just pop the cubes out of the trays and put them in a labeled freezer bag so that I can use the trays again.

Today I pulled out my absolute favorite baby food cook book: Cooking for Baby
I always recommend this book to new moms who are interested in preparing homemade foods for their babies because the recipes are simple, the information is solid, and the pictures are beautiful.
Pureed Pears were on the menu today since we have some absolutely lovely and sweet pears right now. I quartered and cored two pears (keeping the skins on). Steamed them for about 5 minutes. Let them cool and used a spoon to remove the skins. Then it was into the food processor with them and in moments we had Pear Puree!
2 pureed pears filled 1 1/2 ice trays leaving just enough for Clare to lick the bowl clean :) I use these special "Baby" ice trays: Fresh Baby Trays
Tuesday, February 21, 2012
Slow Cooker Beefy Lentil Texas Chili
I have been fiddling with my chili recipe for years, and I think I have finally hit upon my perfect combination of ingredients.

Slow Cooker Beefy Lentil Texas Chili
2 Tbsp olive oil
1 lb lean ground beef
1 large yellow onion, diced small
2 cloves garlic, minced
3 Tbsp dark red chili powder
1 cup dry green lentils
2 cups water
2 (14oz) cans diced tomatoes
1 (26oz) can Ranch Style Beans
Heat oil in skillet over med/high heat. Cook onions and beef, mixing in garlic about halfway. When beef is no longer pink, stir in chili powder.
In a 5 to 7 quart slow cooker, mix together remaining ingredients and beef mixture. Cook on high for 4 hours or on low for 6 - 8.
Enjoy with tortilla chips, shredded cheese, and sour cream!
Friday, February 3, 2012
mmmm... Peanut Butter
So, since I am trying to lose some baby weight I whipped up some delicious peanut butter cookie bars this week.

The great thing about these bars is that they are just peanut butter, honey, eggs, and baking soda (with a few chocolate chips thrown on top for good measure). I found the recipe when I was considering making these gluten-free brownies from Elana's Pantry (which I have made before and LOVE... thank you SIL) and noticed that her recipe had been inspired by this Peanut Butter Bar recipe from the Celiac Chicks. I am not gluten-free, but I love the idea of indulging in treats that do not contain white flour and sugar. Plus, I love peanut butter. I really do.
These definitely passed the family taste-test, even my peanut butter loving Grammy thought they were pretty yummy. And seriously, how can you go wrong with a peanut butter - honey combo?? I highly recommend putting the batter in the recommended 9x13 pan... even though it looks like you can squeeze it into a smaller one. These cookies expand big time! But, caution... these are not diet food :)
Wednesday, October 19, 2011
Learning to Love My Slow-Cooker
After two months at home with a new baby and a busy toddler, I have found that being at home all day doesn't necessarily make getting dinner on the table any easier. One solution to this problem is a renewed effort to make use of my slow cooker.
Mornings are definitely the calmest hours at our house. The baby usually nurses and sleeps, and the toddler is much more capable of entertaining herself than she is during the "normal" dinner prep hours. So I have been using my slow cooker at least once or twice a week to make use of these quiet hours to prepare a hearty dinner.
The easiest so far has been taking out a bag of my frozen vegetable chili from Fix, Freeze, Feast (thawed of course), and dumping it into the cooker. After simmering all day this chili is really tasty. Add some tortilla chips and shredded cheese and you are in business!
I also tried (and loved) a lamb stew that I found on AllRecipes called Rogan Josh. I substituted to lamb chops for the shank, left out the cardamon, and used fresh vegetables instead of canned. Served over brown rice it was really delicious.
The third slow cooker meal that has entered our rotation is Slow-Cooker Chicken Cacciatore from MyRecipes.
We really liked this recipe as well, the only thing I substituted was fresh sliced mushrooms for the canned called for in the recipe. David said this recipe reminded him of traditional Mexican Mole. I thought it was just a bit too oily, so I think I will skin the chicken next time before cooking. We served it over whole wheat egg noodles, though David preferred his in a tortilla!
I am keeping a running list of Crock Pot recipes to try out on my Pinterest board - Please let me know if you have any great ones I should try!
 |
| Photo by: Chuck B. |
Mornings are definitely the calmest hours at our house. The baby usually nurses and sleeps, and the toddler is much more capable of entertaining herself than she is during the "normal" dinner prep hours. So I have been using my slow cooker at least once or twice a week to make use of these quiet hours to prepare a hearty dinner.
The easiest so far has been taking out a bag of my frozen vegetable chili from Fix, Freeze, Feast
I also tried (and loved) a lamb stew that I found on AllRecipes called Rogan Josh. I substituted to lamb chops for the shank, left out the cardamon, and used fresh vegetables instead of canned. Served over brown rice it was really delicious.
The third slow cooker meal that has entered our rotation is Slow-Cooker Chicken Cacciatore from MyRecipes.
 |
| Photo by: Lee Harleson |
I am keeping a running list of Crock Pot recipes to try out on my Pinterest board - Please let me know if you have any great ones I should try!
Wednesday, September 28, 2011
Our Family's Pantry Staples
I have always loved reading other people's lists of the tried and true foods they always keep on hand. I consider my "pantry" a combination of the actual pantry and the freezer and fridge. Any long-keeping foods are pantry foods. I also try to keep track of the meals I can make from these tried and true items, so today's nap-time edition of Lonestar Knits is my list.

Pantry (not counting spices, oils, etc)
Pantry (not counting spices, oils, etc)
- Canned Goods
- Diced Tomatoes
- Refried Beans
- Blackbeans
- Chickpeas
- Salmon
- Dry Goods
- Unbleached White Flour
- Bread, various kinds
- Oatmeal
- Whole Wheat Pasta, Various kinds
- Corn and Wheat Tortillas
- Brown Rice
- Dry Lentils
- Other
- Potatoes (Fingerling)
- Onions (Yellow and Red)
- Chicken Broth
Fridge
- Dairy
- Milk
- Eggs
- Cheeses (Shredded Parm & Mexican Blend!)
- Sour Cream
- Butter
- Other
- Salsa
- Garlic
- Soy Sauce
- Mushrooms
- Carrots
Freezer
- Veggies
- Corn
- Broccoli
- Spinach
- Meats
- Ground Beef
- Beef Kielbasa
- Italian Sausage
- Prepared
- Homemade Tomato Sauce
- Mrs. T's Pierogies
- Cooked and Frozen Beans (cannellini and others)
Pantry Meals
- Spaghetti (obvious), various varieties
- Pierogies and Kielbasa
- Lentils, Sausage, & Rice
- Salmon Patties (add fresh spinach salad)
- Mushroom Pasta w/Ricotta (add Ricotta)
- Breakfast Tacos
- French Toast or Pancakes
- Veggie Stir-Fry (add other fresh veg on hand)
- Pasta with Chickpea-Tomato Sauce
- Mexican Taco Casserole
- Chili, meat or veg
- Pasta w/Red Onions, Spinach, and Mushrooms
- Cannellini Bean & Sausage Gratin (with a few minor substitutions)
- Eggs (of course! Scrambled, Fried, Frittata, Omelet, you name it!)
- Oatmeal Cookies (not a meal... or is it...)
I am sure there are many other combinations!
What are your favorite pantry foods and meals?
Sunday, July 3, 2011
Baby Biscotti

Photo by: SheriW
This ninth month of pregnancy has me not wanting to cook or bake at all. This is very unlike me... so as a pick me up, I made something special - Almond Biscotti.
The recipe I follow for Biscotti is from one of my favorite go-to cookbooks How to Cook Everything


I appreciate that Mr. Bittman really does focus on the fundamentals. These books are almost more like instructions than recipes. Each type of food is introduced with helpful information and then followed by ways of preparing, recipes, and variations of those recipes. Sample recipes are available on the website.
The biscotti recipe starts with a simple plain cookie and is followed by at least a dozen variations. We are into almond right now - hence the almond biscotti.
Here is a link to a similar recipe at The Joy of Baking: Almond Biscotti. Though, it calls for pre-toasting the almonds which I did not do.
Now I am ready to sit down (after the little one is in bed of course) with a nice mug of tea and a plate of freshly made biscotti to pick up my knitting needles and stitch until bedtime.
Monday, May 23, 2011
Filling the Freezer

Oh, baby preparations! So many things whirl around in my head as I await the arrival of our baby Clare. One thing I feel is very important is having a stash of healthy, easy to prepare meals ready to go so I purchased Fix, Freeze, Feast

So far, I have:
- 3 Potato Asparagus Frittatas
- 3 Homemade Spaghetti Sauces
- 3 Black Bean and Vegetable Chilies
- 3 Cheese Manicottis
I loved whipping up the Spaghetti Sauce, or Red Sauce as they call it, because even though it is made with canned tomatoes and tomato paste it smelled so fresh! We ate a sampling that night and it was really delicious.. I may never go back to jarred pasta sauce. I have enough tomato paste left (half the super large Costco can) to make another batch when we are ready.
For the Black Bean Chili, I precooked my own beans from dry rather than buying canned beans. We love beans around our house, and I have really found it to be cost effective (as well as not too large a burden) to cook our beans from dry. I cook a huge batch about once a week and freeze the beans in two cup portions. I also included many delicious veggies from our Vegetable Co-op in this Chili. I love that I can use some of the plentiful proceeds of our co-op in freezer meals so that none of it goes to waste!

The 3 cheese manicottis turned out lovely and you don't even have to precook the noodles! I had enough cheese stuffing left over to mix with some leftover penne and sauce to make dinner for tonight.
I am hoping to make a few more dishes from this cookbook to stash away before all is said and done, and I hope that they all live up to my high expections once we eat them because I would like to continue some freezer cooking in my regular rotation.
Tuesday, December 7, 2010
How I Make Yogurt
I have made yogurt before, but this time I took photos through the process. The main instructions I follow can be found at Small Notebook.
1. I gather my supplies: milk, and individual sized plain yogurt with active cultures, mason jars, my large stainless steel rimmed bowl, a large pot (you could use a double boiler), stainless steel spoon, and liquid thermometer (borrowed from hubbies coffee supplies). Make sure everything is good and clean.
2. I fill the large pot with as much water as I can and still have the bowl sit comfortably on top. Place this on the stove over high heat.

3. Pour a half gallon (2 quarts) of milk into the bowl and occasionally (about every 3-5 minutes) stir and check the temperature.

4. Split the individual yogurt between the mason jars (I am using two large jars). Set aside.


5. Let the milk reach 180F and then take it off to cool. You can use an ice bath to help it cool faster, however I never seem to have ice in the house.


6. Once it cools to 110F, put a small amount in each jar with the yogurt and stir (this tempers the yogurt). Then fill the jars and cover.

8. Put the jars somewhere that they can stay pretty warm for about 7 to 9 hours. Some people use a cooler, yogurt maker, crock pot, etc. I am not sure how these methods work though I have links to some of them on my "In the Kitchen" page if you are interested. I use the good old fashioned "stick them in the oven with the oven light on" method. It works just fine for me.

9. After approximately 7 - 9 hours, remove the yogurt from the warm place, stir, and put in the back of the fridge to cool. The longer you let your yogurt sit the more sour the taste of the finished product. I like mine to sit between 7 to 8 hours. Don't be alarmed if you see tiny green "lights"or "sparkles" in yogurt when you stir... those are just your little friends and they will go to sleep when cooled.
10. After completely cooled, enjoy! Mix in your favorite combo of sweeteners and fruit or use for smoothies. It is also good as a sour cream substitute and babies love it!
1. I gather my supplies: milk, and individual sized plain yogurt with active cultures, mason jars, my large stainless steel rimmed bowl, a large pot (you could use a double boiler), stainless steel spoon, and liquid thermometer (borrowed from hubbies coffee supplies). Make sure everything is good and clean.
2. I fill the large pot with as much water as I can and still have the bowl sit comfortably on top. Place this on the stove over high heat.

Did I mention that I got this milk for $2.99! I love the manager special!!
It is perfect for yogurt making!
3. Pour a half gallon (2 quarts) of milk into the bowl and occasionally (about every 3-5 minutes) stir and check the temperature.

4. Split the individual yogurt between the mason jars (I am using two large jars). Set aside.


5. Let the milk reach 180F and then take it off to cool. You can use an ice bath to help it cool faster, however I never seem to have ice in the house.


6. Once it cools to 110F, put a small amount in each jar with the yogurt and stir (this tempers the yogurt). Then fill the jars and cover.

8. Put the jars somewhere that they can stay pretty warm for about 7 to 9 hours. Some people use a cooler, yogurt maker, crock pot, etc. I am not sure how these methods work though I have links to some of them on my "In the Kitchen" page if you are interested. I use the good old fashioned "stick them in the oven with the oven light on" method. It works just fine for me.

Please ignore the very dirty oven.
10. After completely cooled, enjoy! Mix in your favorite combo of sweeteners and fruit or use for smoothies. It is also good as a sour cream substitute and babies love it!
Subscribe to:
Posts (Atom)